Replacing
Front Pads on 75-87 99 and 900s
These cars are
equipped with the front e brake on the front calipers. Any time the
pads are due for replacement, it is necessary to inspect the
components and make sure everything is adequate to insure safe brake
operation. This includes making certain the rotors are within minimum
thickness and run out tolerances, that the e brake is functional and
not locking up, there are no brake fluid leaks from any lines,
calipers or master cylinders, that the fluid has been flushed and
replaced at least every two years, and that the power assist is
functional.

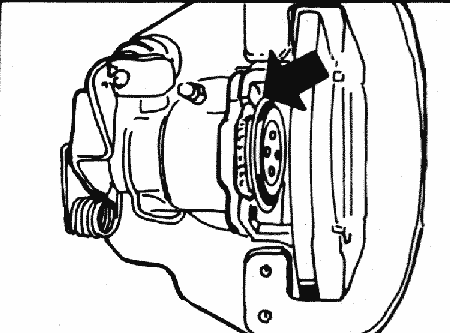
Secure the car wheels and chock the rears. Loosen the front wheel lug nuts. Raise the front wheels and remove them. Turn the rotor so its notch on its outer edge lines up with the pads so that if there is a lip, the pads can slide past it at the notch. Remove the clip holding the U clip that holds the pads. Insert a flat screwdriver in the outer side of the rotor and the caliper and pry the caliper to the outer side a bit to remove the outer pad. Use the screwdriver to pry the caliper the other way to remove the inner pad. Inspect the dust boots on the piston and replace them if they are torn to keep dirt and moisture away from the piston. Make sure there are no visible fluid leaks at the piston. If so, it is necessary to tear down the caliper and inspect it for rebuilding. It may be more economical and time saving to replace a leaking or locked caliper with an rebuilt unit if there are any problems.
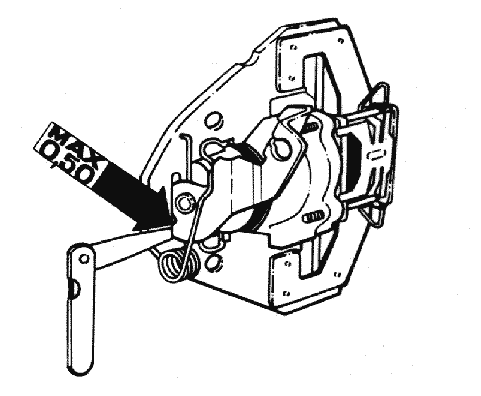
Make sure the lever for the hand brake moves freely. You push it toward the caliper to apply the emergency (parking) brake. It should return when you release it of its own spring tension. If not, you will need to attend to that or replace the caliper. If the lever sticks, the pads will drag and/or the caliper will not adjust itself or the parking brake will not hold. If replacing the and lubing the bushing where the lever enters the caliper doesn't cure the problem, the internal parts are rusty and it is safest to replace the caliper. Make sure the parking brake cables allow the lever to return far enough that a .019" feeler gauge ( .5 mm) fits snug at the bottom of the lever between it and the yoke of the caliper. If the gap is too big, adjust the cables looser to decrease the gap. You can do this with the parking brake hand lever in the car released from the rear of the center console, or by simply turning the cables with a pair of vise grips at the caliper. This later method is a bit risky if there is a possibility the cables may be tight in their sheaths. If they do not turn easily from this end, do not force them. Go inside the car to make the adjustment. Make sure the cables aren't frozen in their sheaths from rust/corrosion.

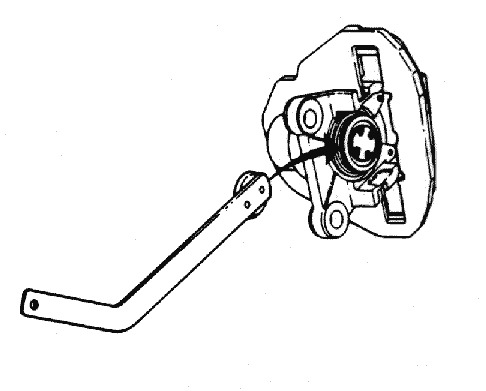
Using the special tool ( easiest way) ( P.N. 8996043) turn the piston in (clockwise) while prying gently on the back of the tool with a flat screwdriver. After a few turns, pry the caliper as far as it will go to the inside of the rotor and apply brake grease to the sliding area of the yoke. See here for more info and pics. Then pry the caliper back to the outside of the rotor until you have enough clearance to insert the outer pad. Apply brake grease to the metal sides and back of the new pad before you install it. Then slide the caliper back toward the inner side of the rotor and use the tool to turn the piston in farther to get enough room to insert the inner pad. Lube it as well before installing. Do not turn the piston in any farther than necessary to insert the pads, or you may not be able to get it to self adjust later without removing the pad and turning the piston back out a bit. Install the U clip and its clip and the stone guard under the U clip. See here for details on installing the U clips and springs correctly.
Look Here For Rotor Specifications and Info

Repeat the procedure for the other side.
Before bleeding the brakes, if it hasn't been done in the last two years, or pumping the pedal, pull up the hand brake 7 clicks. This will keep the self adjuster from overextending and adjusting the pistons too tight and causing a brake drag. With the hand brake applied, pump the brake pedal to adjust the front pistons until the parking brake engages with 8-9 clicks on the hand brake. Release the hand brake and insure the wheels turn freely without dragging.
You now have to carefully seat the new pads or noise complaints and longevity may arise. Make the first stops at low speeds, gradually bringing up the speeds between stops. Take care not to overheat the brakes, give adequate time between stops fro them to cool off. Really for the first few days you should avoid high speed sudden stops and repeated brake application if at all possible until the pads seat well. If all four wheels get pads at once, you may feel like the pedal is mushy. This can be caused by all new pads and the compression the now thick new friction material allows. Make sure the car will stop and if after a few days the feeling doesn't go back to feeling normal, re bleed the brakes just to be sure.