Rear Brake
Pad Replacement 88-> 900 and all 9000
Tools Needed
Supplies Needed
First secure the car so it can be raised with a jack. Use the jacking point in front of the rear wheels. Make sure the car is secure, chock the front wheels and release the emergency brake. Open the hood and check the brake fluid level, If it is nearly full, draw a bit off to prevent spillage when the pistons are retracted. You might want to cover the reservoir with a rag just in case. Loosen the lug nuts on the rear wheels and jack the car up to remove the wheels. If this is your first time doing the brakes, you might want to lower one side onto a jack stand and take both wheels off. But only do one side of the brakes at the time. You always have an assembled side to compare the other you are working on that way.
Slip the end of the emergency brake cable out of the arm on the first side you do and position it under the arm to stay out of your way for a while. Remove the 14 mm plug on the rear of the caliper. See the diagram below. Using your small flat screwdriver, pop the anti rattle spring off the outside of the caliper. Turn the 4 mm Allen screw inside the hole the 14 mm plug was covering. Note: the 14 mm plug has a copper ring behind it to help seal out moisture, be sure and keep it for reassembly. Turning the 4 mm Allen will retract the piston for pad removal. Turn it until it bottoms out and the piston is fully retracted. No force need be applied to the piston to retract it, the 4 mm Allen will do it all by itself.
Remove the end covers on the slide pins. Using the 7 mm Allen, remove the slide pins. Clean them with a wire brush and set them aside. Pull the caliper off and remove the old pads. Inspect the dust boot on the caliper piston and replace it if it is torn. Using the wire brush, clean the grooves in the caliper mounting bracket. Spray the caliper off with brake cleaner.
Using the Anti Seize or the Molylithium , lube the pads on their backs and on their sliding contact points. The lube on the back will help to deaden vibrations and stop squealing. The slide points will keep the pads from seizing/rusting to the caliper mounting bracket and moving freely. Be careful not to get any lube on the friction material of the pads or the rotor.
A word about rotor condition. Unless the brakes are metal to metal meaning the friction material is worn off the pads and their metal backing plate is in contact with the rotor, always begin a brake job with a test drive to test the condition of the rotors. Gently apply the emergency brake while at speed and note if there is any vibration. Vibration would indicate that the rear rotors are out of round and need to be replaced. I say replaced as opposed to 'turned' on a lathe or resurfaced, because the rear rotors are thin to begin with and removing metal from them will only weaken them and cause their premature failure or imminent warpage. This also takes into account the difficulty with getting Saab rotors of any type since the 900 on a lathe true. The rotors have a bezel on the inner surface that makes mounting them on a brake lathe time consuming and frankly, not many machine shops will take the time to make sure they mount the rotors and check the run out. Most just assume when the rotor begins cutting that it is warped when what is happening is it is not mounted true. when they turn it until it seems true and is being cut around its whole diameter, it has in fact been cut untrue and will behave exactly as a warped rotor when reinstalled, severe vibration when the brakes are applied. If you feel no vibration when you ease up on the emergency brake while at speed, your rear rotors are true. If you do however feel vibration when applying the foot brake, you have warped front rotors. If there are no vibrations, then you need to again examine the rotors once the tires are off. If they are grooved from wear any deeper than 1-2 mm, they will pull and squeal on that side with new pads. Heat buildup will be enhanced and warpage or glazing may occur. Small grooves are fine and nothing to worry about. I have even seen rotors reused with no problems after the pads were run metal to metal as long as the damage was not severe and the rotors were still thicker than minimum spec. Minimum thickness on these rear rotors is 9.5 mm. If you have an open ended 10 mm wrench, try and see if the rotor will fit in between its blades. If it does and there is very much play at all, the rotor is too thin and should be replaced. Do not try and use rotors that are damaged, show heat cracks, are below minimum thickness or are warped. Your life, your families life, and other people on or around the roads are all in danger if your car has sub par brakes.
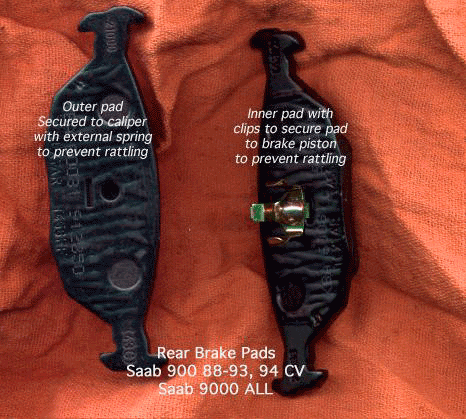
Now for the reassembly. Place the outer pad in the caliper mounting bracket. Slip the inner pad with its integral clips in the piston in the caliper and put the caliper back in place. Liberally lube the slide pins and apply just a touch of Blue LocTite to their threads. Secure the caliper to the mounting bracket by tightening the slide pins. Replace the slide covers to prevent water and road grime from entering and corroding the slides, possibly seizing them. Put a bit of the anti seize or moly lube on the ends of the anti rattle spring and reinstall it. The trick to this spring is to start one end in its hole, and hold the other end as close to its hole as you can, you can actually start it too, but keep one ear from behind the mounting bracket and when you get the ends started in their holes, use the small flat screwdriver to pry the other loop of the spring over the mounting bracket if you can't do it with your hands. This just may be the most aggravating thing about the job. Get that spring on, and you have got it licked.
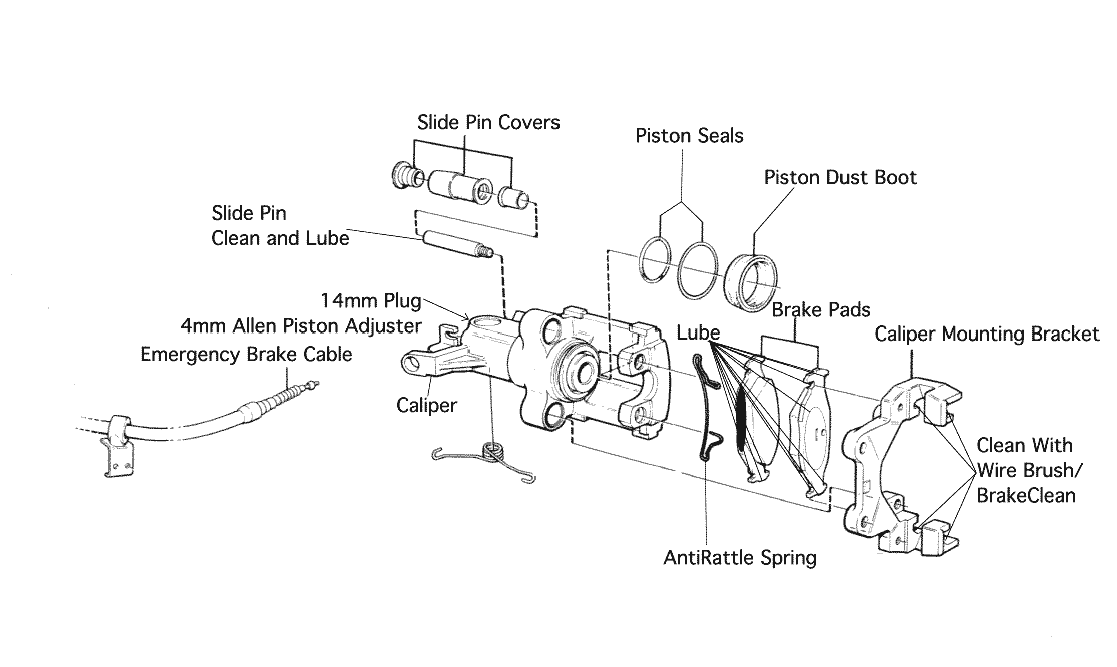
Now you need to adjust the piston back to hold the pads at the proper position. Turn the 4 mm Allen in and the piston will tighten. I run the 4 mm up until the wheel locks and I cannot turn it. Do not force the 4 mm tighter, just until the wheel locks up. Then back the 4 mm back out until you get about 3/8 inch travel on the e brake arm where the cable attaches to lock the wheel again. Push the arm toward the front of the car and note how far it takes to get this travel and lock the wheel. I generally find that between 1/3 and 1/2 half a turn back off the Allen after the wheel locks will give me the proper travel on the lever and the brakes will be adjusted properly. Make sure the wheel turns freely when the arm is released, if not, back off until it does. Reinstall the 14 mm plug and its seal in the hole.
The adjustment of the piston back in is the part that makes the emergency brake hold. Failure to do this and attempting to adjust the cable will not work. Make sure the e brake is not held by the cable when adjusting the piston. Be sure and check for drag, there should be none.
Now move your attention to the emergency brake cable. If its boot is in bad shape, replace the boot. It is a good idea if you live in a cold climate with road salt and harsh winters to pull that boot back and pack as much anti seize or grease in the cable and boot as you can to prevent water from entering the cable sheath and either corroding it or simply freezing and locking the emergency brake on. Should the emergency brake freeze on you in the winter, do not drive the car, reach in and remove the cable from the arm allowing it to release. BUT MAKE SURE THE CAR WON'T ROLL OVER YOU AFTER YOU RELEASE THE ARM.
Once you get the cable in good condition, reinstall it into the arm on the caliper. Make sure the cable does not pull on the arm with the emergency brake released. If it does, you need to adjust the cable. On the converse to this, it shouldn't extend past the arm either. Pull back on the arm to make sure it is fully returning. If it is, then tighten the cable by turning its end clockwise. you will hear clicks from inside the car as you turn indicating the cable is being adjusted. If the cable is really hard to turn from here, stop. You will have to go the end in the interior (remove the console) to adjust it. The cable, when properly adjusted should just touch the arm, but be neither loose or pull the arm at all.
After you finish the assembly, but before you put the tire back on, get in the car and pump the brake and pull the emergency brake handle up. Make sure that the emergency brake locks the rotor and that it unlocks after you release the handle and the pedal. If not, either readjust the 4 mm Allen, or the emergency brake cable, depending on which is locking/dragging the brake. Also recheck the fluid level in the reservoir and adjust as necessary. If it hasn't been done in the last two years, go ahead and bleed the brakes and flush out the old fluid. USE DOT 4 FLUID ONLY IN A SAAB!!
You are almost done with the first side. Now reinstall the tire. You might want to apply a bit of lubricant to the threads so they will come off easier next time. Now would be a good time to rotate the tires if they need it too. The final step is to torque the tires to 80-90 ft/lb.. It is imperative to use equal torque on the lug nuts and not to be excessive. Uneven torque will cause the rotor and or hub to warp, due to the uneven forces when the metals get hot. Brake vibration will result. Remember my discussion of the difficultly of putting the rotors on a brake lathe? Well, part of that is also due to lips made into the back side of the rotors. These lips will distort the rotor if excessive pressure is applied from the lug nuts. Again, warpage is the end result, that or a cracked rotor, neither very desirable.
After you get both sides to this stage, there is still a step left, the seating process for the new pads. You want to go for a drive. For the first few stops, avoid high speed sudden brake applications. Just be easy, you do not want to overheat and glaze the new pads. After several stops or brakings, gradually build up speed and slow down with the brakes, but make sure you allow for a cool down period between stops. A 5 mile test drive is usually adequate to seat the pads. With some of the thicker brake pads, you might experience a softer feeling pedal while they are brand new. The friction material is compressing a bit because it is so thick and new. After the new pads get hot a few times, the pedal should soon firm back up. If the pedal doesn't firm up after a few days, make sure you're safe. If the brakes are known to have been bled and flushed at the yearly intervals, and you had a firm pedal before the pad replacement, and you opened no line or bleeder screw while the pads were replaced, or saw any loss of fluid, the pedal should firm back up as the pads wear in. Doing all four wheels at once really makes the first test drive feel strange. just don't heat them too hot too fast.