81-93 900 94
900 CV BLOWER MOTOR TESTING AND
REPLACEMENT
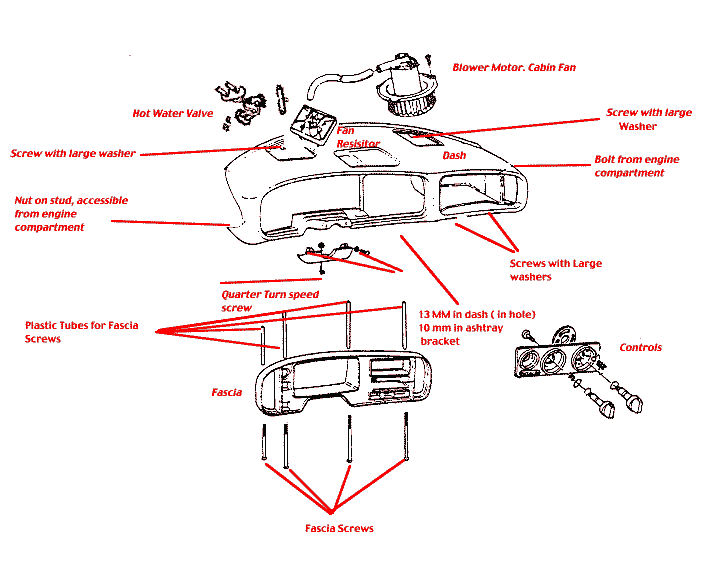
The blower motor on the classic 900 resides under the dash cover on the right center side. You can access its connection and test it by removing the right speaker grill.
First thing to check is the fan fuse in the fuse box under the hood. Fuse 9.
Unplug the two wires going to the fan and test it for power and ground with either a test light or voltmeter with the key on and the fan control switch switched to high. If you do not get power to the fan, first try moving the selector switch to <=> . If still no power, try moving the selector anywhere but <=> and turning the fan controller to all the speeds, checking the wires to the fan for power at each different selected speed
If you are getting no power to the fan, the next place to check is the selector switch for the distribution. Remove the radio and its box to access this wiring. There will be five pins on the switches used, one is blank, a pin but no wire on it. Sometimes the wires get crossed when other repairs in the dash are done. First check that the wiring is correct. From the top of the switches to the bottom, the correct wiring is single gray wire on the top pin(larger gauge wire of the two gray wires), gray and violet wire on the second pin, small gray wire on third pin on the upper switch and on the lower switch top pin is not used, second pin is the single violet wire and the bottom is the yellow and violet wires.
While you are there, make sure the connector for the fan speed selector is plugged up. Since the connector sits near the opening for the radio, pushing the radio box in the dash can push the connector off the fan switch.
The resistor block for the speed control lives under the left front speaker, in the air box to the right of the opening, close to the firewall. It has a single connector with 5 wires on 4 pins with a black rubber hose attached to it for cooling. Leaving this hose disconnected either from the resistor pack or from the fan can cause the bimetal overheat protection strip in the resistor to trip and blow the fan fuse. There was an update for early resistor packs to solve a weakness in the overheat strip. The resistor just snaps into the ducting, but is a bit hard to remove and replace due to the tightness of the quarters. Remove the resistor pack and check from its pin 5 across each of the pins 2-4 for continuity, the farther from 5 you go back,the higher the resistance should be. Inspect the contacts on the switch for the overheat protection. If you see arc marks on it, it has been activated. This could be from a weakness in the strip (replace the resistor), a missing or kinked cooling hose from the resistor to the fan, or excessive current draw from the fan. To distinguish the cause if the fuse is blown, you need a ammeter to measure the draw of the fan. Connect the ammeter across the fuse for the fan and watch for a draw both on initial start up and upon sustained running. If it is over 28A, replace the fan. If it is under 28A, suspect the overheat strip in the resistor. If the fan draws over 22A after it is running, it may be popping the fuse at times. Replace it if that is the case.
On a job
involving a lot of wiring and disassembly of various parts like this
does, you will ease your confusion by marking anything before you
take it all apart. Unforeseen interruptions can come up and when you
get back to the job you might have no clue where something went or
came from. If you mark and label efficiently, these problems won't
occur. Pay close attention to things as you pull them apart,
orientation, which clips hold what, which bulb or switch goes where.
Make yourself some notes or draw a picture. If you seem to be having
to use a lot of force to remove something, make sure all the
retainers are out of it before you break it. Aside from pulling off
the steering wheel, nothing else on this job requires force. Patience
and maneuvering maybe, but not brute force. There have been numerous
updates or manufacturer changes on the blower motors. At one time
there were even instructions on covering the motor to prevent
unwanted noises with a thick insulation blanket. Do not install any
insulation over the motor, or add lubrication. The latest motor Saab
supplies is made by Nippondenso and is a very good motor, much better
than any previous one and worlds different from any aftermarket
offering. Do this job a second time and you will wish you had the
factory Nippondenso unit.
To replace the
blower motor, you will have to remove the dash top. The trick to the
repair is letting the dash rest on your lab instead of unplugging all
the wires and completely removing the dash from the car. To do this
will require a little planning ahead and some care not to damage the
wiring.
First, if not already done, remove the front speaker grills and the defroster ducts. Two screws, either Phillips or Torx 10s, and a pull up on the front and out will remove the speaker grills.
Then remove the lower cover on the steering column by removing either the two Phillips or Torx 20 screws in the face of the cover and the quarter turn plastic speed screw on the bottom with a flat bladed screwdriver. Pull the cover down and be careful not to break its tabs for the screws. The screws have small washers on them to prevent tearing the material on the dash, keep up with them.
Next, you need to get the steering wheel out of the way.
On non airbag cars, just pop off the center cover to access the 22 mm nut holding the wheel on. Mark across the wheel and the shaft so you can get the wheel back on in proper alignment. Then loosen, but do not completely remove the nut. Leave it on by a couple of threads so when the wheel comes loose it doesn't smack you in the face. Then grip the wheel at 9 and 3 o clock and pull upward until it comes off. Using a rocking motion hand to hand will get them off. Then remove the nut and set the wheel aside so it won't get damaged.
On airbag equipped cars, there are two Torx 30 screws holding the air bag to the wheel. The airbag must be removed to remove the wheel. As long as the key isn't turned on while the air bag is disconnected, no code will be set. If you turn the key on with the air bag disconnected, you will have to have the tool to reset the light. There is no danger of igniting the airbag if you connect and disconnect it with the key off. The torx screws will stay in the wheel, the bag will come off the wheel after loosening the bolts. Unplug the connector in the center of it when you raise it up. Follow the above instructions above for the rest of the removal of the wheel.
Now, remove the two either Phillips or Torx 25 screws holding the bracket for the turn signals and wiper switch on the column and pull the whole assembly down. Let it hang from the wires out of the way.
Next, pull out the switch for the headlights, seat heater, left mirror, fog light, all on the left of the dash. Mark the connectors if you think you may get confused as to where they go. Under the bottom of the dash, there are four long screws holding the fascia (dash face/insert) in. Remove the left two and pull the fascia out a bit to reach in and disconnect the two wires for the rheostat for the dash lighting. If the rheostat turns when you try to adjust the lights, pop off its cover and tighten the 17 mm nut securing it to the fascia. If the headlight switch turns when you use it, a wrap or two of electrical tape around its edge where it contacts the dash will tighten it up and prevent the turning.
Now remove the radio and its box if not already out. You can use the tools that came with the car to remove the radio, they are the two u shaped wire tools (either red or black) with a small chain connecting them. If you don't have them, use some length of a coat hanger for the tools, Insert the tools in the holes on the sides of the radio and then just pull it out. The box on older models has tabs bent in to hold it in the dash. Bend them out to remove it. Newer models simply require a slight prying under the top and bottom to release them from the dash, pull them out. Disconnect the wiring, the connectors are designed to only go one way.
Now remove the screws holding the dash to the car. Under each speaker there is one, either a Phillips or a Torx 25. Under the glove box are two more. Reach in the opening for the radio and disconnect the vacuum lines to the distribution selector switch. The lines are held by a metal clip that two tabs on the plastic piece attaches, top and bottom. Release the tabs and pull off the lines as a gang, all at once. Disconnect the rod running from the temperature selector switch to the hot water valve. Most of the switches in the center of the dash can be left attached if you do not plan on removing the dash from the car.
If you want to remove all the wiring and completely remove the dash from the car, mark the connectors for the switches. Many will interchange physically but not functionally. This might be the advisable way to do the fan motor the first time. It will give better access, allow you to move around easier and expose the instrument cluster for inspection/repair of any problems there while the dash is off. It would be a good time to change any burnt out dash lighting. A note on the illumination for the heater controls. There are three bulbs there. Two are for dash lighting and one is the seat belt reminder. They all plug into holes in the dash. the two bulbs for the lighting will have similar colored wiring. The seat belt bulb will have a different color wiring and not be connected to the other two. Make sure you fully seat the bulbs in their holes to get the most illumination on the controls.
While the dash is down or out, you should do your best to repair any of the plastic tubes and clips that the long screws holding the fascia to the dash pass through. These keep the fascia secure and prevent it from pulling out and letting the hot water valve rod fall off either the switch or the valve. Super glue on the ends of the tubes works to hold them in place if the plastic pieces in the fascia aren't broken. If they are broken, epoxy type adhesives that dry hard work pretty well to hold the tubes, you just have to allow them to dry. LocTite makes an epoxy that behaves just like J B Weld except it dries in about 10 minutes. A little Vaseline around the edges of the dash where it contacts other pieces will eliminate a lot of those nagging squeaks and rattles.
With a new motor, I always check it before installing. I make sure it runs before I tear everything apart. After you get one bad one installed and everything put back together before you realize it, you'll always remember to test the new one before you start.
Now before you remove the dash, if you are going to try the lay the dash on your lap trick, get what you need at hand while you are seated at the right front seat. You'll need the new motor, a Phillips screwdriver, or a Torx 20 and 25 driver depending on the year of the car. Gently pull the dash forward and turn it down so it rests on your lap/knees. The tightest wires will be the wires going to the glove box light switch, the ground may pull off here and is a challenge to reconnect. You can reach over and pull the duct off the ventilation box at the top and push it to the left a bit. Then the hard black plastic duct for the right defroster vent needs to move, there are two screws holding it down. Remove them and slide the duct off its rod by pulling it to the right. Reach around and remove the right window duct tube (the gray paper duct) from behind the fan motor. It is often stapled to the duct at the vent, easier to pull the duct off the vent than the tube off the duct. The ducts maybe stabled to the dash. The tubing is usually taped along the car. Just move it out of the way. Then disconnect the wiring to the fan. Then remove the rubber hose coming off the body of the fan motor and going to the resistor pack. No need to take it off the resistor, just off the fan.
The fan is held with either three Phillips screws or three Torx 20 screws. They are spaced around its metal housing. Remove them and lift the fan up and out. It may take a bit of maneuvering to get the fan blades and housing out of the hole, but it will come out without force.
Feel around in the hole and make sure nothing is in there. clean it out if there is. Then reinstall the new fan. You may have to install it into the hole and then turn it to line up the screw holes. Reinstall the screws for it and don't forget to reattach the rubber hose. The newer motors require that you swap the ends on the connector to plug into the new motor. This is pretty straight forward, but be sure you check it before putting everything back together. If you have an airbag car and want to check the fan before putting everything back together, just plug the airbag to its connector before turning the key on. It does not have to be attached to the wheel to do this, just don't let it come unplugged while the key is on, or the SRS light will come on and it will take the special tool to turn it off. It is possible to wire the fan backwards and then the output will be much reduced. If the fan runs but doesn't seem to put out much flow, try switching the wires. Its a good idea to test the fan after you get it mounted to make sure the blades are clear and don't touch anything.
Just remember how everything came apart and put it back. Pay attention to the wiring and don't pinch any of it. Make sure the vacuum lines for the distribution switch go back on and that the metal retainer clips into the tabs. Before you screw the dash back down, make sure the rod for the heater valve is on both the switch and the valve. Many fascia get broken from forcing the rod on without loosening the dash or the fascia. The switch or the heater valve can be broken as well as the rod if it is forced on with a tightened dash. Be careful not to knock any of the vacuum lines from the various motors off the motors. One vacuum leak in the dash will render the distribution selector inoperative and may affect the idle of the engine. Align the dash with the vents to push it in.
The push button switches at the bottom center of the dash may not align correctly at first. You may have to reach in the radio hole and route their harnesses to get them to look even and level. Make sure no wiring gets around the heater valve rod. When reinstalling the radio box, remember to connect the antenna and reach in the left speaker hole and guide the wiring out from behind the box as you insert it. On newer cars, the radio will have to be recoded to be operational, make sure you know the code. If not, a dealer can get the code for you if you take the car to them. You will need the serial number and part number off the radio. They need to see the car usually to prevent someone who stole a radio from calling and getting the code.
If the vents in your dash won't hold the position you put them in, or close themselves in a 900, you can tighten these up by inserting small ac o rings around their swivel pins. Just pry the moveable part of the vent out, gentle persuasion at the top or bottom of the piece, pushing it up a bit will release that pin and you can pull the vent out. Put the o rings on the pegs and push the vent back in until it locks in the holes. The o rings act like washers and tighten up the vents enough to let them stay where you put them, no matter how hard your new fan blows.