HEATER VALVE
REPLACEMENT 81-93 900, 94 900 CV
Heater valves
fail in several ways. They can develop a leak that appears on the
left floorboard. They can become so stiff that the rod will not stay
on or become very hard to turn. They can leak internally and prevent
the blockage of flow through the core thus heating the cabin even if
the temperature is turned to cool. They can also do the opposite and
block flow through the core when the temperature selected is hot. 83
1/2 and 84 models may require a accelerator pedal rod
modification/replacement to accommodate the new style black plastic
heater valve. Factory replacement valves will be if the newest design
and contain information about the pedal interference that you should
follow. 92 and newer cars may have a problem with the bypass valve
located in the heater hoses in the engine compartment, above the
alternator. This valve can block flow to the heater core or develop
leaks. It is there to prevent loss of cabin heat at idle,something we
do not see a need for if the rest of the cooling system is up to par.
See the Cooling
System Section for
more on this. When we see a problem with this bypass valve, we simply
remove it from the car. You can splice in connectors in its place or
better yet replace the heater hoses and it with heater hoses from a
earlier car without the valve.
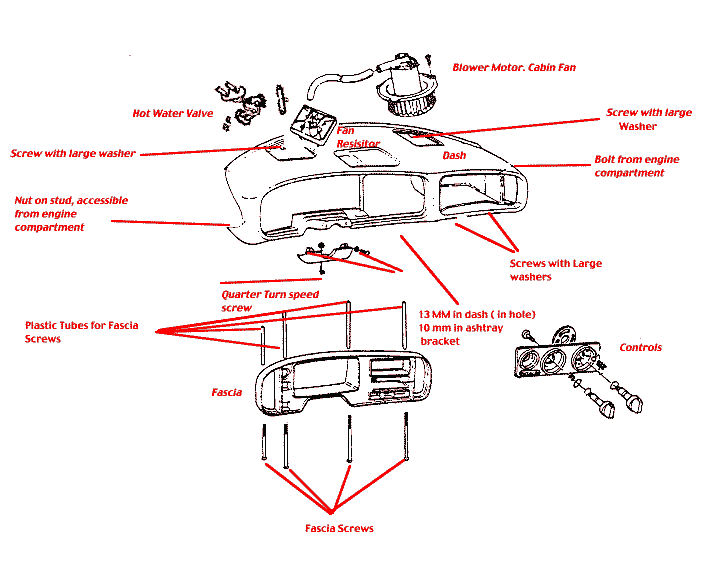
Remove the two coolant hoses going to the valve in the engine compartment. You may drain and flush the cooling system at the same time, or just enough to do the job. Then remove the radio and its basket. Use the u shaped tools with the chain between them or some pieces of old clothes hanger to insert in the wholes at the sides of the radio and just pull it out. Remove the ashtray and the two long screws, either Phillips or Torx 20 holding the dash fascia in. The long screws come up from the bottom of the plastic part of the dash, the one farthest right is a bit of a challenge to find, tucked behind the ashtray bracket. This will allow the fascia to come out far enough to get the rod from the temp selector to the valve off the valve. You do not need to remove the dash or fascia, just pull the fascia out slightly to get the rod off.
Then working from underneath the dash and/or through the speaker grill, first remove the Phillips or 25 Torx screw at the far left that holds the floor duct and the insulation up. pull the duct down (it will bend) and get to where you can see the four screws, either 25 Torx or 4 mm Allen's holding the valve to the core. Remove them and then remove the valve through the left speaker.
Do not loose the black cover that goes over the left mounting screws, this prevents the cruise chain from hanging on the screws and must be reinstalled.
Clean the heater core mounting area with a pot scrubber. On the new valve, double check the screws in it and apply either Vaseline or silicon gasket sealer to the o rings to hold them in the grooves for them. Then reinstall the valve, being careful not to disturb the seals. Guide the tubes through the grommet in the firewall for the cooling hoses. Remember that the hose coming from the water pump goes to the top tube on the hot water valve. Reversing them can generate a little heat inside the car when the valve is turned off as the bypasses in the valve allow flow through the core this way.
When you get it all together, don't forget to bleed the air out of the cooling system via the bleeder screw on the thermostat housing when refilling the coolant.