Classic 900 and 9000 Thermostat Replacement And "While You Are There"
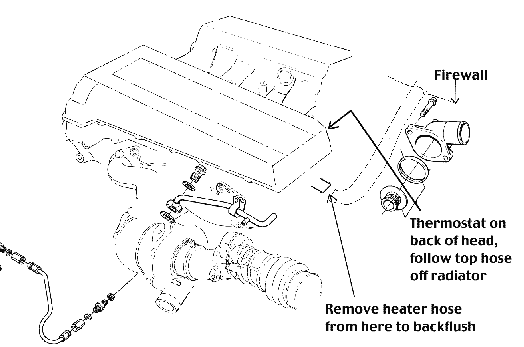
The thermostat lives under the thermostat housing. On a 900, follow the top radiator hose out of the right side of the radiator to the point it attaches to an aluminum neck on the engine. On a 9000, follow the top radiator hose out of the left side of the radiator. This neck is part of the thermostat housing. First step is to drain the coolant. Turn the heater temperature inside to full hot to allow the heater core to drain on 900s. 9000s circulate coolant through the heater core all the time, you need do nothing to open the core. Open the cap on the coolant reservoir on the left side of the engine compartment in 900s and the right side on 9000s. As in most repairs it is far nicer to work on the car when the car is cold for thermostat replacement. Then loosen the drain on the radiator at the lower right side facing the engine. On a 90 and up 900s I believe it is a 24 mm if it is the factory radiator. Replacement radiators may have a flat screwdriver plug there. Older 900s have a 17 mm drain. 9000s have a drain on the bottom right of the radiator, accessible from underneath. I find it easier just to remove the bottom radiator hose from the water pump as the drains tend to become brittle on 9000s and may break off. Anyway, place a pan that will hold a couple of gallons under the car to catch as much of the old coolant as possible and let it drain out.
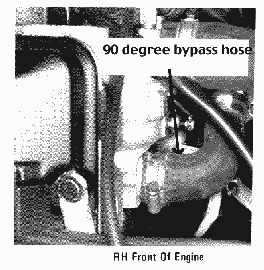
I will go a bit further than just the thermostat replacement as I feel it is to your car's advantage to have other work done to it while the thermostat is being replaced and allow you to take advantage of saving as much as you can while you are there. Inspect the top radiator hoses and on a 16V 900, the bypass hose under them on the engine (It has a 90 degree turn in it and is about 6 inches long and and inch, inch and half in diameter). Include the heater hose off the back of the head on 9000s. These hoses carry the hottest coolant in the engine and fail first from the inside out. Outside they look fine, but inside may have deep cracks. If they appear to have aneurysms or a swelling right behind their hose clamps, replace them while the coolant is out to save on a break down and loss of the new coolant you are hopefully going to put in with the new thermostat.
It is a good idea to back flush the cooling system while it is empty. On 900s, remove the clamp on the hose running to the inside of the car from the continuation of the metal pipe coming from the 90 degree bypass hose you checked above. The pipe will turn up and come out just behind the a/c compressor. Undo the clamp there and remove the hose. On 9000s, use the heater hose than comes off the back of the head. Place a water hose in the hose you removed from this pipe and allow the water to run through the car until it comes out clear everywhere. You will need to give the hose a chance to run it everywhere you open to be sure and really flush the system. Place the water hose in the reservoir for a while, in the top radiator hose for a while when you get it off, and in the metal pipe you took the hose off of previously to start the flushing, but use the rubber hose going into the interior of the car for the most flushing.

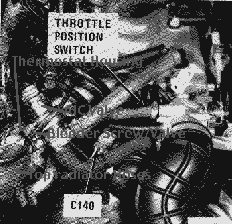
To get to the thermostat bolts on a 900, you will need to remove the AIC valve, the idle control valve. It is held by a bracket on top of the thermostat housing. Unplug its connector on its top for the wires and then remove the one 10 mm bolt pinching its bracket closed. The valve will have two hoses on it running back to the throttle body, you can either remove them and get the valve totally out of the way (clean the valve out with carb clean if you remove the hoses) or just lay it out of the way with the hoses attached. On a 9000, a variety of things may be attached to the thermostat housing and more may have to be moved to get to the bolts holding the thermostat housing depending on the year of the car. Most common is a bracket holding the fuel pressure regulator with 4 mm Allen screws. On later 9000s, you have to remove hoses from the throttle body to get at the thermostat. get as much as necessary out of your way and remember where it goes for reassembly. Don't forget the ground wire on DI cars with the updated cassette. Now you should be able to see the two 12 mm bolts holding the thermostat housing to the engine. They may be tight due to corrosion build up. Remove them and clean their threads with a wire brush and put them aside. On a 900 16V, the pipe that comes around the engine from that bypass hose is held by the lower bolt in the thermostat housing, The bracket from this will hold the thermostat housing even after the bolts are removed. Pull up on it slightly and remove the thermostat housing. the thermostat itself is not visible. It may also be stuck in its hole if it has been there a while. Pop it out by prying on it with a screwdriver. Clean the machined surface in the engine for the thermostat with a wire brush and the sealing surface of the thermostat housing as well. Wait until the flushing is finished before reinstalling the new one.
Saab thermostats are special. They have a three position operation. the first position is full closed and it blocks all flow to the radiator until the engine warms up. The second position allows flow both to the heater core and the radiator to provide cabin heat and cool the engine. This is the position the thermostat should be in most of the time while driving. The third position of the thermostat allows full flow to the radiator and blocks flow to the heater core as the plate on the bottom of the thermostat blocks the passage to the pipe to the heater. The thermostat reaches this position when the engine is nearing overheating and allows coolant to flow directly to the most efficient heat exchanger, the radiator. The heater core is bypassed because the heater valve has bypass circuits in it and is not exposed nor has the flow capabilities of the radiator. This allows for maximum cooling of the engine when it is needed. Aftermarket designs usually do not incorporate these three positions, only two. The biggest complaint from people who use incorrect aftermarket thermostats is no heat after the car warms up in the winter. Saab supplies two thermostats, an 89 and an 82 degree unit. We highly recommend using the 82 degree unit to keep the engine as cool as possible but still within its designed operating temperature.

The factory thermostat comes with its gasket. You put the thermostat in the gasket, the gasket having a slot in it to fit the lip of the thermostat. Note that there is a brass valve on the top of the thermostat, really just a hole with a stopper piece of brass in it. and that the bottom plate of the thermostat has a hole in it. Turn the hole in the bottom plate to align with the top brass stoppered hole and insert the thermostat in the engine with these holes aligned to the top or highest point. The holes allow air trapped in the system a place to exit. An air pocket can block flow or cause a hot spot in the engine. You need to allow the air a way out for maximum effectiveness.
No sealants are necessary if the thermostat housing and the sealing surface in the engine are not pitted real bad from the old coolant. If you see pits here, it is advisable to place a small amount of gasket sealant on the surfaces to fill these pits. We use LocTite 518 Anaerobic sealer. Silicon sealants will work in a bind.
Position the thermostat housing back on over the thermostat, taking care not to disturb the thermostat from the engine and to maneuver the housing under the bracket for that pipe. Apply an anti seize compound to the bolts for the housing and carefully start them by hand, aligning the pipe bracket and the housing with the bottom bolt hole. The anti seize will make both this reassembly and future thermostat changes easier. Tighten both screws only when you are sure neither is cross threaded and that the thermostat is properly seated. If the thermostat housing has a gap under it when you tighten the bolts, the thermostat has probably come out of the recess for it and is being pinched between the housing and the engine. A bad coolant leak and a damaged thermostat will result.
If you decide to use a cooler fan thermosensor to keep the engine from running hot in traffic, change it now. It is located in the upper left corner of the radiator facing the engine and has two wires on it. Simply unplug the wires and unscrew the old switch. Make sure the old gasket comes off with the old switch before installing the new one. Look on the cooling system page for more details, especially for 9000s.

Go ahead and replace the rest of the removed items. Check all the cooling hose clamps while you are there. There are three clamps on the back of the 900 water pump notorious for loosening and leaking if not tightened as preventative maintenance. Follow the big hose from the coolant reservoir on the left of the engine compartment to the back of the water pump and then look for the clamps. A 1/4 drive swivel 7 mm socket with a long extension, makes these a lot easier to reach and secure. If at all possible use a 7 mm socket on the hose clamps instead of a flat screwdriver which can damage the heads of the clamps. Note that there are some small hoses going to the throttle body that carry coolant as well. Tighten all the clamps you can.
Shut the radiator drain and now it is time to refill the system. Our shop has had a dramatic reduction in cooling system problems since using Mercedes Benz factory coolant/antifreeze. It is formulated to resist electrolysis and corrosion in the system that is highly susceptible to it from the many dissimilar metals in it. At $8-10 a gallon, it is the cheapest part in the cooling system and arguably the most important. The definition of a battery is two dissimilar metals in an acidic solution and that is exactly what you get with an aluminum head, cast iron/nickel block and old coolant with phosphates. This is the number one reason for head gasket erosion and failure. With the M/B coolant, we see no pitting of the aluminum and no erosion of head gaskets. It may just be me, but it seems to dissipate heat better too, cars with it seem to take longer to get hot with no other modifications or changes. DexCool, a GM "super coolant" has recently been receiving rave reviews, mainly because its supporters laud its extended service life. GM issued a bulletin debunking this myth for cars that have previously had any other ethylene glycol coolant in them. If the car came from the factory with DexCool, it can have an extended life, but if the car ever had regular coolant in it at any time, the DexCool should be changed just as often as any other and it may react with deposits left from the old coolant and be detrimental to the cooling system.
You want to use as close as your local climatic conditions will allow a 50/50 antifreeze/water solution. Less antifreeze and you run the risk of rust, possibility of a higher freeze point or lower boil point, and lack of lubrication for the water pump. More and you loose some heat dissipation and flirt with the formation of deposits as particulates form and fall out of solution with the higher concentration of the chemicals. But you need to ensure you have enough cold weather protection for the most extreme winter your area might see. For most of the US, a 50/50 mix is sufficient. In a classic 900 or a 9000, the capacity of the cooling systems makes 1.25 gallons of coolant ideal for a 50/50 mix. Since you hopefully flushed the engine with water until it ran clear, there is still some water in the engine. I start refilling by pouring in the 1.25 gallons of coolant and then topping up with water to make sure I get enough coolant in the car.
Before refilling, again make sure the temperature control for the cabin heat is set to hot. Then locate the brass bleeder nipple on top of the thermostat housing. Hold the bottom part of the bleeder with an 11 mm or 7/16" wrench and open the top portion of it with another same size tool. This allows air to exit the system as you add the coolant. leave the bleeder open until a steady stream of coolant comes out and the reservoir is filled to the MAX line. Close the bleeder temporarily and start the engine. You will probably notice that the level in the reservoir has fallen a bit and will see a few air bubbles coming up in it. Open the bleeder screw again and let it stay open until it flows a steady stream of coolant again. Shut it tight this time. Drive the car until the fans come on and then park it and once more open the bleeder screw until no air is expelled. Top up the level in the reservoir to the max line and let the car cool off. 9000s have no bleeder, but you still need to position the thermostat correctly, just as in a 900.
Check for any leaks and recheck the coolant level in a day or two just to be sure.