9000 EDU
BULB REPLACEMENT
First you'll need
a 20 torx driver, a 10 torx driver, or possibly a Phillips
screwdriver, depending on the year of the car, a 8 mm socket or
wrench and a 25 torx driver.
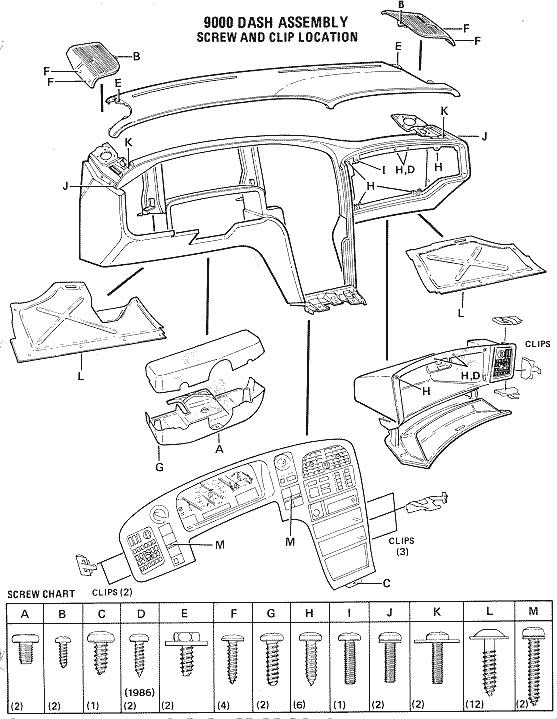
Pop off the trim pieces on each A-pillar, by the windshield. They are held by three clips that just pop out when you pull back on the panel. Then remove the three screws holding the speaker grills on each side. Be careful if they have LEDs or solar sensor installed in them. If you go back down the LEDs length, you can unplug them at a connector. Make sure you position the wiring so you won't forget it on reassembly or lose it down in the dash. Remove the rubbery speaker insulation.

Now remove the two screws on each side as well as the 8 mm bolt holding the dash top down. On the side above the glovebox, open the glove box and remove the rubber plug along its upper side. There is a screw behind that plug. Remove it. On newer 9000s there is one more screw about 2/3 of the way across the instrument cluster going upward into the dashtop. Find and remove it if the dash top seems to still be held there. After the screws are out, raise the front of the dash top and pull it toward you. Some have a cable that needs to be installed in a clip, all have a clip at the rear center that must be pulled in and out of. Carefully remove the dashtop from the car, it has sharp edges that may cut seats, dash etc. Newer cars have the solar sensor in the center of the dash, reach in and disconnect its wiring.
There are two screws at the upper corners of the instrument cluster. They come in from the back. The bottom of the cluster is held by two feet with rubber boots on them. Picking up the cluster often causes these feet to fall off. I find them and use a bit of glue to hold them to the cluster. If they aren't reinstalled, the cluster will fit loosely and rattle, vibrate. If the feet are lost, you can slit a piece of vacuum line and use it in their place or PlayDoh or dum dum will work too.
With the key off, carefully unplug the electrical connectors. There are several plugging directly into the cluster and a couple of long ones that go to the edu. They are all so that you can't interchange them, they either won't reach to the wrong hole or they have pins to prevent putting them in the wrong place. On turbos, disconnect the vacuum line going to the turbo gauge.
Now just remove the cluster and replace the bulbs. Use the same wattage bulbs. Some come out of the holders and some have the holder made to the bulb. The smaller ones come with the holders and the larger ones are replaceable.
There is one special bulb for the charging system battery light. If an exact replacement can't be found for it, leave it be. It is of a different crucial wattage for the charging system to function properly. The bulbs for the edu are in the very bottom of the cluster. While you have the cluster out, clean the connections and I suggest replacing all the bulbs while you are there.
Also while it is out, if you have fuel gauge problems, check the solder joints to the gauge, I have found many cracked. Resoldering them fixes the gauge. They commonly mess up with bumps or heat. You will have to separate the cluster sections to inspect the fuel gauge.
Installation is the reverse of removal, just be careful to get the clip at the rear of the dash top in place, the cable in the clips if equipped and the feet for the cluster. Make sure you reconnect the turbo hose on turbos. Check all the bulbs before replacing the dash top after reinstalling the cluster. You should be able to do this in about an hour or less.