HYDRAULIC
MOTOR MOUNT LIMITER BRACKET MOD
Want a cheap quick
way to increase the life of your front hydraulic engine mount on a
9000 or the hydraulic trans. mount on a 900? These mounts now range
in price from$150-$260 from the factory. The mounts have a inverted u
shaped bracket over them that is meant to limit engine travel by
contacting the rubber bumper below it on 900s or the washer's tab on
9000. There is too much travel here, the mount's rubber is stretched
a lot. Add oil and heat and failure is imminent. Before you buy
another mount, do this mod.
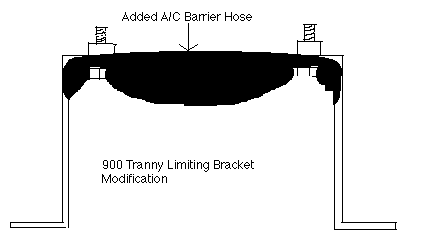
900
NOT ALL HAVE HYDRAULIC MOUNTS. IF THERE IS NOT A INVERTED U SHAPED BRACKET HELD WITH 2 12 MM BOLTS OVER THE TOP OF THE MOUNT, YOU DO NOT HAVE HYDRAULIC MOUNTS
Access the trans. mount. Remove cooling fans and induction tubes (on turbos). Unbolt the two 12 0r 13 mm bolts with sleeves holding the upper bracket in place. You should visually inspect the mount by removing the rubber bumper and the 19 mm nut under it. Gently raise the end of the transmission (jack it up) and watch for the mount to become free. There should be no tears or separation in the rubber mount around the encased stud. If good, lower the engine back down and retightened the nut. if the mount is broken where the stud meets the rubber, replace the mount. Be careful not to lose the washer that sets on top of the mount while raising or lowering. Make sure you reinstall the washer the same way it came off. Focus on the limiting bracket. See the two holes at the top of it? No real drilling required. Get a length of good tough 3/4 ac rubber line to match the interior top edge of the bracket. Split the line and wrap it under the bracket. Its tough stuff, you may need help(vise) to open the hose and get it to fit the bottom of the bracket. Hold it in place and drill through the two small existing holes in the bracket through the hose. Use a bolt to fit through the hole with a large diameter outer surface washer on either side. Run the bolt up from the bottom through the rubber first securing with LocTite and another washer and a nut. Trim any exposed threads above the nut off to prevent rubbing and any future repair injury. Resecure the bracket and removed parts. Make sure the rubber you added isn't so thick that it makes contact between the arm and the bracket all the time. If it does, the mount may transfer a lot of vibration into the frame from the motor and bug you in the car.

9000
ALL 4 CYLINDER 9000s HAVE HYDRAULIC MOUNTS. A COMMON MISCONCEPTION IS THAT THE UPPER ENGINE TORQUE ARM LIMITS ENGINE MOVEMENT. IT DOES TO SOME EXTENT, BUT NOT ENOUGH TO PREVENT LOWER MOUNT FAILURE. IT USUALLY ONLY FAILS AFTER THE LOWER MOUNTS FAIL AND THE FULL TORQUE OF THE ENGINE IS THEN TRANSFERRED TO THE ARM.
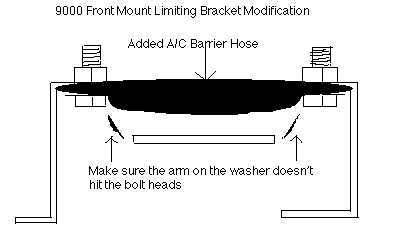
Jack up the car on the right side. Look in and find the front lower engine mount. You can raise the engine slightly to inspect it for the same thing as above. To modify its bracket, remove the inner 10 mm nut and feel for the 14 mm that secures its other end and remove it. Some 9000 brackets require drilling for the bolt holes but essentially the same procedure as above with a piece of ac line. Drill the holes for 6 mm bolts(1/4") at the edges of the bottom of the U, spaced in enough to allow the washer you use not to extend pass the edge of the bracket. Position the split ac line around the inner surface of the bottom of the U bracket. Drill straight through the ac line and run the bolts through it so that they squeeze it flat when tightened. Countersunk machine screws work best and use no washer on the bottom on the ac line. This will allow them to pull into the ac line and not contact the tab on the washer on the top of the mount when it comes up to contact the bracket. Reinstall the bracket.

The added hose will now limit the movement of the mount and dampen the contact as well, resulting in not only longer mount life, but a smoother ride.
Replacement of the mounts is doable at home, but you need a floor jack really. Jack up the right side of the car and remove the right wheel. Remove the fender well plastic liner, there are several 8 mm nuts and screws holding it on and one 7 mm in the front lower corner. Later 9000s use 10 mm bolt head here. You may need to remove just the front half of it or the whole thing, depending if you are doing the front mount, the rear or both. I highly recommend doing both while you are there. The front mount usually separates and the rear one weakens and allows the engine to drop down. The front one will bang around under acceleration and the rear one will transfer vibrations if it drops. Oil on either will cause the rubber to deteriorate. Clean up oil spills from filter replacements and repair any leaks to keep the oil off the mounts.
Remove the a/c belt on models with a separate a/c belt to give yourself some room. Up to and including 88 models, loosen the 13 mm nut on the idler pulley and turn the 17 mm behind it clockwise to release the tension on the belt. Remove the 19 mm nuts on either mount stud. Then remove the 7 bolts holding the sub frame to the chassis. It will drop a bit, but not far, placing the jack under it before removing the last bolts will safeguard the bolts threads and allow a controlled descent of the sub frame. You will need to insert a pry bar of some type in between the sub frame and the frame at the front point and pry the gap open enough to insert a 2X4 to hold the gap open. This may not be necessary to remove the front mount if it is broken, but will be necessary to get the new mount in place. Remove the 10 mm nut on the front mount holding the limiting bracket on. The nut goes onto a shoulder bolt and you will have to put a flat screwdriver under that bolt as you remove the nut to keep it from turning. Remove the 2 bolts holding the mount to the sub frame and remove the mount.
The rear mount is a bit more trouble, but not much. I remove the three 12 mm bolts holding the bracket to the engine that ties the engine to the mount. (The bracket that the 19 mm nut on the top of the mount holds) Move the bracket out of the way and then remove the three bolts and nuts holding that mount to the sub frame. You may need to put the jack under the oil pan and lift the engine slightly to get the mounts in and out. Use a piece of wood between the jack and the pan to prevent damage.
Place the new mounts in position and start their bolts but do not tighten them yet. Do the modification to the front limiting bracket if you are going to do it and then position that in place. Make sure you put the washer back on top of the mount with the arm on it oriented correctly. It should face the limiter bracket with the arm bending up, not down. If you install it upside down, the washer will transfer a lot of vibration. If you leave it out, there will be nothing to limit the travel of the engine and the mount will die rapidly. Go ahead and reinstall the rear bracket with the three bolts now. You can start it on the mount, but don't try and tighten the 19 mm nut yet.
Lower the jack on the engine gently, making sure the engine starts on the mounts studs. Make sure you get all the bolts started before you set the engine all the way down. Now remove the 2X4 from the front between the frame and sub frame. Place the jack under the sub frame and raise it back close enough to start the 7 bolts for the sub frame back. Go ahead and start them all and then tighten them, pulling the sub frame up to the frame. Now go back and tighten all the mount bolts and nuts and after you reinstall the wheel well liners and the tire, you are done.