81-93 900 & 94 Convertible Ball Joints
Since the spring rests on the upper control arm on a C900, its pressure is transfered to the lower control arm via the ball joints. In order to check them for play, you would have to overcome that tension to move the ball joints if you do not unload the suspension.
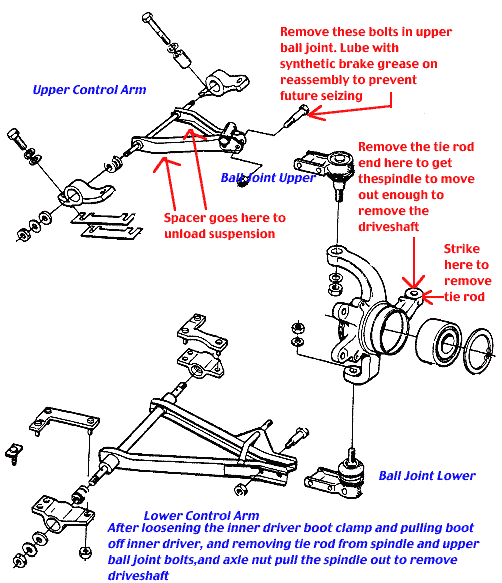
Saab has a spacer tool, some use old axle nuts, anything about an inch thick that will not compress will work. You reach in behind the tire, with the car sitting on the ground on its wheels, and insert your spacer underneath the upper control arm where it comes through the wheel well. The effect of the spacers is too limit the upper control arm's travel downward when you raise the car, transferring the spring's tension to the chassis through the spacers instead of the lower control arm. Once the spring's tension is removed from the ball joints (unloaded suspension), any play in the ball joints becomes easy to find. Really worn ones can then be detected just by grabbing the wheel and pulling/pushing on it from top to bottom. A big pair of pliers can squeeze the ball joints and show play. Or a length of board under the tire can be used to pry upward while someone watches the ball joints for movement up and down. New ball joints show no up and down movement.
To replace the ball joint, leave the spacer in place. Without the spacer, diassembly and reassembly of the spindle to access the ball joints is nearly impossible. You will need to remove the hub cap and loosen the lug nuts and the axle nut before raising the car. The axle nut is 32 mm. Raise the car. Remove the tire. Remove the brake caliper and hang it from the spring with a coat hanger to prevent it from damaging either the cv boot or the brake hose. On early cars with front e brakes (up to 88), the caliper mounting bolts are held down with locking tabs on a plate. Bend these up with a chisel or flat screwdriver. Remove the 19 mm nut on the tie rod end. Reinstall it hand tight to protect the tie rod threads. Hit the spindle where the tie rod enters with a hammer sharply to remove the tie rod end. Remove the nut and the tie rod after it breaks free. Remove the bolts going through the bad ball joint. On early cars they may be 14 mm nuts and 16 mm bolts. Later cars have 17 mm nuts and bolts. Pull the spindle toward you, pulling the ball joint out of the control arm and the axle from the hub. Leave the axle in the car. Loosen the 19 mm nut holding the ball joint to the spindle. A hammer smack will remove the old ball joint in the manner you removed the tie rod. Install the new ball joint and tighten its nut. If the shaft spins, you can squeeze the ball joint in the spindle with pliers or use a screwdriver or allen wrench in the end of the shaft if the brand you are using has such a allowance. Lube the bolts that go through the ball joint and control arm and the axle splines with grease to make any future repairs easier. Reinstall as you took it apart. Use a new axle nut and torque it to 200 ft lbs. Inspect your brake pads and cv boot while the spindle is apart in case they need repair.