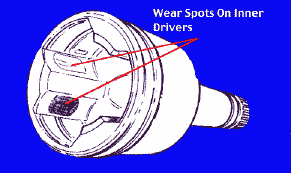
A problem with an outer cv joint usually arises as a rapid clicking especially in hard turns. It is evident at slow speed turns. At speed you may have a slight vibration in the steering wheel that is road speed dependent. Most joints failing do so after their boot has broken and the lubricant got out and water and grit in. Under the loads and with the range of motion in the joint, any grit gets worked into the mix well and the lube becomes an abrasive. Not removing this stuff completely when replacing a boot allows the grit to grind away at the joint. Disassemble the joint and clean it out well. They are neat puzzles. An inner joint usually shows up as a vibration under acceleration or load. They usually fail on the right or exhaust side first. The boot and the grease are constantly in a high heat area. A lot of times the boot was fine but the grease became so thin it ran out of the joint where the outer sleeve ends on the cup or just evaporated. You will often find them with rusty needle bearings in the tripod bearings.
Be warned, you'll spend a good bit of time searching if you accidently knock a cap off an inner driver tripod bearing. There are a few rollers there and they bounce well off a concrete floor and grow legs and run all over the shop. Though they won't fall off, sometimes it seems the slightest glance will send them flying. A rubber band around them will hold them in place while the joint is out. Or fold a clean rag around the boot and slip the clamp over it.
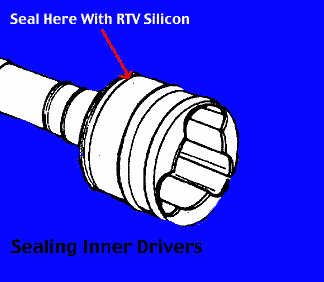
If you are seeing that the grease is getting out the inner drivers where the outer sleeve ends on the actual end of the driver cup, we have found that cleaning the area well and applying a thin RTV silicone bead and working it under the sleeve a bit and allowing it to dry overnight before driving at speed stops the leaking. If done carefully and no excessive silicon is used, it won't cause a vibration problem. It will save you one. If there is any question of the inner joints being low on grease, pack them. We have used Castrol MP Wheel Bearing Grease in the inners for over ten years and it works really well there. Good new inner boots come with the recommended grease, just don't use inner grease in an outer joint. If you have a clean empty inner boot and tripod, packing the inner driver cup full of grease will fill the boot when you insert the joint. Just start the boot on the bottom of the driver before pushing in the joint and guide the boot on over the driver as you go and its all ready to go. Just to be sure you don't forget it, slip the worm clamp for the inner boot around the driver on the tranny so it will be handy and in place before putting in the drive shaft. The recommended lube works well here too, but we find the grease lubes as well and stands up to the heat a bit better, especially on 900s.
We do use the cv grease recommended for the outer joints and that comes with either quality boot kits or joints. We also use one extra tube along with the one that comes with the boot or joint.
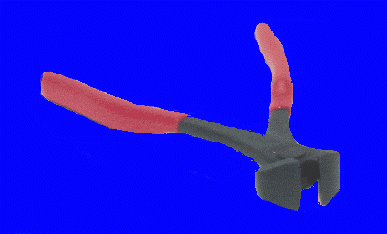
No special tools other than an end cutter are needed to remove or install most cv boot clamps. Fancy pliers exist for them, but a pair of end cutters like below work fine, for removal and installation. Use metal clamps. Plastic tie wraps can break and let the boot come loose. Clamps should hold the boot to a clean shaft tight enough that the boot doesn't easily turn on it. Use a small flat screwdriver through the hole on the outer part of the clamp to pry it over one of the tabs on the inner part. The clamp should be snug on the boot. Now use the end cutters to squeeze the folded part of the clamp together and tighten the clamp firmly. Be careful not to cut the clamp, just tighten it.
Use a good quality boot to protect the joints. The quick fix split boots often become the quick fail type. Inspect the boots at every oil change. Attend to broken ones as soon as possible. Watch for outers to develop cracks that get deeper until they turn into tears. When the cracks start getting deep, plan to replace the boot. Good boot kits come with a tube of recommended lube and clamps necessary to install them. Really good kits come with new circlips and axle nuts. You may need an extra tube of grease to be sure.
The axle nuts on Saabs need to be well secured. Older style outer cv joints have a grove in them and the nut for them has a lip in its outer end as a provision to stake the nut to the shaft. They are cadmium colored. These always use a thick washer behind them to secure the outer cv to the hub. Newer cars use a nut with a smaller lip on them and the washer actually made to them. They are black. The lip is made to be out of round and to grip the outer cv threads. All these nuts are one use. On the early nuts, you may get away with swapping the nuts to opposite sides ( unless you swap the outer joints side to side). Just make sure that the nut has an unstaked lip over the groove when you are finished torquing it. Use a punch and hammer to stake the lip to the joint in the joint's groove. Do not reuse the new style nuts. The nuts have to maintain the torque to protect the wheel bearing from loads that could pull it apart were the nut to back off. On 9000s especially, many strange noises have been traced to loose axle nuts.
Driveshaft Disassembly For Outer CVs or Boots (exc. 94- 900)
A vise comes in handy for this part. If you are removing the outer joint, before locking the shaft in a vise, pull the boot back and reach in toward the center of the outer joint and find the ends of the circlip. Position the shaft in the vise so you can get at these with a pair of circlip pliers. These are external circlips, you need to spread the ends to release them. Spread them and pull on the outer cv, it should slide off. Sometimes it takes a tap or two on the inner part of the joint that splines to the shaft while spreading the circlip to get them moving. Pull it off and set it aside. You might want to mark which side it came from. Cut the smaller clamp on the outer boot and slide the boot off the shaft. If you are changing the inner boot too, you can cut its clamp and slide it off the end the outer one came off. Clean the shaft. Slide the new boot on the shaft. You can slide the new clamp with it, but most come open to be fitted around the shaft after the boot is on. It just depends on the type of clamp. When both boots are on the driveshaft, turn to the outer joint and clean and repack or replace it.
Wash or wipe off as much of the old grease as you can first. Leaving some in the joint makes its disassembly easier. Tap one side of the middle ring in the joint down so a ball comes up out of the cup. You may have to pop the ball out of the hole by gently getting a small flat screwdriver behind it. Keep removing the remaining balls the same way. When all the balls are out, turn the inner part so one of its "arms" is in line with one of the holes in the middle part (cage).Rotate the middle part so its holes line up with the "arm" on the outer part. Turn the middle part on its end and remove it from the outer part. The inner part will come out of the middle part now. Wash it all up. Look on the thrust surfaces of the inner and outer parts. You may see worn lines across the face of the inner part and depressions on one side of the faces on the outer part. Here is your clicking noise. Now its decision time.
I have had joints with wear go back together with fresh grease after being cleaned and swapped to the other side of the car go a long long time with no noise. Some are just too far gone to chance reinstalling though. They may work fine, but have the noise. I have seen many making noise last for years before getting any worse when cleaned and repacked.
If you reassemble the joint, put some new grease in the outer part first, insert the inner part into the middle part. Note the inner part has an inside and an outside. The circlip goes to the outside, facing you so from the end the driveshaft inserts. Put the middle part back in the outer part and align its holes with the grooves in the outer part for the balls. Turning one grove and hole up at the time, insert the balls, one to a groove. Its easier to me to insert them on opposite sides as you go one to the next. Pack the joint well with grease . Good quality boot kits come with a new circlip for the outer joint too, us it. The circlip installs into the inner part of the outer joint.
Now, if you cleaned the splines well, the joint will slip back on the driveshaft. Put whatever grease from two tubes I have left after packing the joint, into the outer boot. Line up the splines ( universal, no 'master' spline) and push the joint back on. Sometimes tapping the end of the joint with a soft hammer is needed to spread a new circlip to let the joint start on. If you have to beat the joint on, something is wrong. When the joint feels like it went home, pull back on it to make sure the circlip fell into the groove on the driveshaft.
Pull the outer Boot up and onto the outer joint. Give the joint a few twists through its range of motion to burp out air and get the grease moved around. Make sure its groove is in line with the groove on the joint for the big outer clamp. Install the boot clamp as you did the smaller inner ones.
If you need to replace the tripod bearings, place the driveshaft in a vice and remove the circlip on the end of the shaft. Tap the old tripod bearing off, noting that one of its faces is tapered. This face goes on the shaft first so the bearing will seat deep enough to allow the circlip to be reinstalled. Not much of a problem getting the old one off as putting ht new one on. With the old one you can fail away, just don't damage the splines on the drive shaft. With the new one, you have to be careful not to loose a cap. A socket that fits the edge of the inner part of the tripod bearing can be used between it and the hammer to protect the caps from getting struck. Be sure and use a rubber band around the caps to help keep them in place. A punch may be necessary to fully seat the tripod bearing on the shaft, never strike the caps to seat the bearing, just its inner most part, near the splines. Be sure and start the tapered face of the tripod first, just as the old one came off. Its seated when the circlip will go on the end of the shaft and fit in its groove there. See below for pictures of the shaft and bearings.
Disassembly
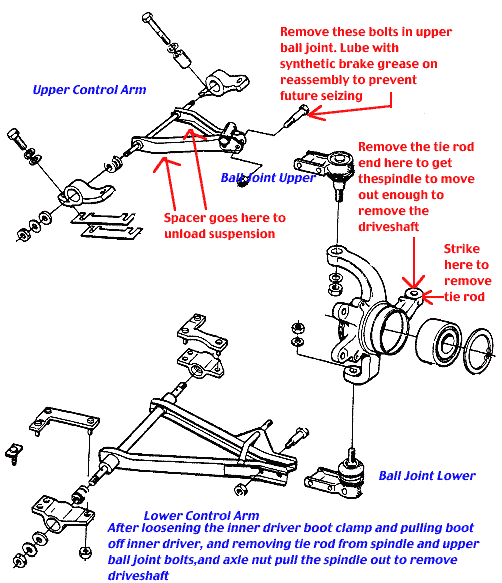
First, break loose the axle nut and remove it if you do not have air tools. It is a 32 mm nut. You may have to have someone hold the brakes to get it loose. Go ahead and remove the nuts and loosen the lug nuts on the tires. Reach in on the side you want to attack first and lay the axle nuts on the frame just under the upper control arms. You might want to use something like PlayDoh to hold them in place. Jack up that side of the car, making sure the nuts stay under the upper control arm and on the frame and prevent the arm from lowering enough to transfer spring tension to the lower control arm. This unloads the spindle. Remove the tire. Now is the time to check ball joints, brake pads, rotors and calipers too.
Remove the 17 mm nut on the tie rod end holding it to the spindle. leave it on the last few threads to protect the tie rod end. If you take a 32 oz hammer and smack the spindle around the tapered part of the tie rod end, the tie rod end will pop out. Remove the nut and the tie rod . If the tie rod turns while you are trying to get the nut off, applying pressure down on the tie rod may help. Now, remove the two bolts holding the upper ball joint into the upper control arm. Removing the upper ball joint will allow more travel in the spindle and the upper ball joint bolts less frequently rust and seize to the ball joint than the lower ones do. Early cars used a 16 MM bolt head and a 14 mm nut. Later ones used 17 mm bolts and nuts. I use an air gun on the head of the bolts first and if that doesn't get them loose, I heat them red hot with a torch and get them out. Often select words and a few well aimed smacks with a big hammer and punch gets things freed up. Sometimes there's no recourse but to sacrifice the ball joint. OE ball joint kits come with all necessary hardware brand new. When reassembling, use a synthetic grease on them to make future repairs a bit faster. The same grease used on the brake pins and slides and pads works well here.
If you are in a bind and can't get the bolts loose and don't want to have to break them or cut them out, try removing the ball joint from the spindle like you did the tie rod end. This will require a bit more maneuvering to get the spindle down enough, but its workable.
Slide under and turn the driveshaft you have in the air until you can see the business end of the worm clamp holding the inner cv boot to the inner driver. If OE, its a 7 mm to open the clamp. Reach in and gently pull the boot off the driver. If OE lube, this can be messy with the lube running out like oil, so put a pan under it. Older boots can tear. Be gentle. Start the boot off in one place with a finger under it and then work it off, dont pull straight on it to remove it. You will get a dirty finger.
Make sure the outer cv joint will move in the hub. If it is stuck, don't beat directly on it with a hammer. You will mushroom the threads and make starting the new axle nut a bigger job than the boot replacement. If you have a big pointed punch, put it on the outer joint in the center depression and smack it loose. A block of wood between the hammer and the joint might get it loose as well with no damage. When you get it to move back a bit, pull the spindle out of the upper control arm. Be careful with the inner tripod, try and leave it in the driver and push the driveshaft back and out of the spindle while the spindle comes down. You can maneuver the spindle and get the outer joint out of it and then maneuver the shaft out of the car. Wrap a clean rag on the inner boot with the boot pulled up around the tripod. Then slip the clamp down over it to secure it. Be careful not to allow the spindle to be held by the brake lines. Use a Bungie cord to hold the spindle, not the lines. Be careful while taking out the driveshaft not to damage the brake lines. If you need to, remove the caliper from the spindle. On cars with the emergency brake in the front ( up to 88), bend the locking tab on the 19 mm bolts holding the caliper assembly to the hub. You may have to remove a pad to get the caliper off the rotor. LocTite the bolts and rebend the tab on reassembly. On 88 and up cars, simply remove the two 19 mm bolts holding the caliper assembly to the spindle and push the piston in a bit to remove the caliper from the rotor. Use LocTite on the bolts on reassembly and don't forget to pump the brakes before driving away to re adjust the pistons.
On reassembly, make sure you insert the driveshaft carefully through the opening to the inner driver, taking care not to get grit from the car into the tripod bearing/inner boot as you go back. Make sure you passed it under the brake lines and cables, especially on front emergency brake cars. Insert the tripod in the inner driver and work the inner boot on the driver. Make sure your clamp is there, but don't tighten it just yet. Push the shaft all the way in the inner driver and maneuver the outer end into the hub. Lube on the splines helps this time and next time too. Lube on the sides of the ball joint help it slide back into the control arm. You might have to tap stubborn ones back in, just make sure the driveshaft stays both in the inner driver and the hub in alignment with the splines as you do. Lifting up on the lower control arm while aligning the bolts for the ball joint makes things easier.
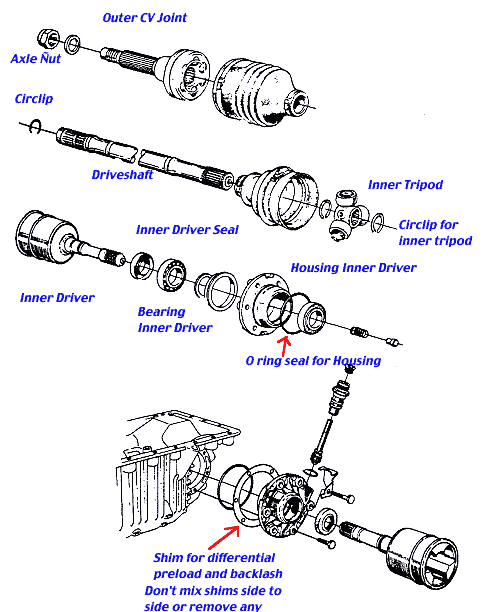
Follow the steps above to remove the driveshafts. When inside the transmission/differential, try to be as clean as possible. Note that there are two sizes of inner drivers for a 900, early smaller ones and later larger ones. Neither of the two types will interchange. It take complete driveshafts along with inner drivers to change types. These can be readily identified by the number of rings around the inner drivers outer sleeve.
Drain the transmission on a manual or the differential on an automatic. The drain on a manual up to 1990 and on a automatic differential will be either a 3/8" square drive or a 12 mm Allen. Earlier cars have the square drive. A 3/8" ratchet or extension will fit the square plugs. A sharp smack on the drain plug straight upward will often make getting them loose a lot easier. They can be really tight. 1990 and later manuals have no drain and you remove the differential cover to drain them. This would be an excellent time on one of them to change the tranny filter as well. The refill for the manuals is on the passenger side of the transmission. Early ones have a dipstick, later ones a 19 mm nut that is a dipstick on the same side cover. Automatic differentials refill via a 3/8" square drive plug on the passenger side just above and in front of the right inner driver. Fill into that hole until the lube flows out the hole, let it drain from there a bit before putting the plug back in.
On the left side driver, remove the speedometer cable. Then remove the 6 12 mm bolts holding the driver housing to the transmission. Pull the driver housing out of the tranny, you will have to work the housing back and forth to get it out. A soft hammer on either side of the driver usually persuades them right out. The driver will have a spring and plunger in its end inside the tranny. Make sure you retrieve them and later reinstall them. There are thin metal shims on each housing. They are to stay with that housing. Do not lose any or swap them side to side. They adjust the differential carrier bearing preload and set the backlash. Use care not to damage them while getting the drivers out should you decide to try and pry the housing out. Be careful prying, you might break the housing or gouge the tranny case. Sometimes loosening the bolts on both sides before trying to remove the driver housings makes the bind less and eases the job.
Note the distance the driver cup extends from the axle seal. On the left side housing with the speedo gear, remove the plastic gear so its protected during the rest of the procedure. Remove the circlip holding the inner driver in the driver bearing and with a soft hammer or a block of wood, tap the inner driver from the housing. The inner driver doesn't fit tight into the bearing and a press is unnecessary for its removal. Install a new axle seal and housing o ring while its apart. If you decide to swap the drivers side to side, you will have to remove both sides at once and the differential ring gear can drop down. This is not a big deal, you'll just have to be careful starting back the drivers and insure the spider gears in the differential mate with the drivers splines. You can reach in from one side and align/lift the differential while inserting the driver on the other. That driver will hold things for the other driver's insertion. If the spider gears fall, just put them back in engagement with the other gears exactly opposite each other.
Swapping is a possibility if the drivers aren't damaged too much. If you have rusted tripods with powdered needle bearings and deep cups in the faces of the inner drivers, it is probably best to replace them, especially on an automatic transmission, if there is any doubt. Swapping works when the damage is minor, not when it has gone too far. You can never begin this job with the mindset of swapping them. You cannot tell the condition until they are apart. So be prepared to change them and be happy if you don't, not unhappy if you can't and now the car is apart and you have no new drivers or seals to go in.
With the new seals in place, slip the housing down over the driver. Use a punch on the inner race of the bearing for the driver ( seated in the housing) to drive the housing and bearing down on the driver until the circlip can be reinstalled ands seats in its groove. Then use the soft hammer or wood to hit the end of the driver that goes in the tranny to seat the bearing fully in the housing. They tend to come up during all this . Try and turn the driver in the housing and make sure it extends as far as it did before and that it does not touch the housing, Compare the distance the cup is from the seal that you noted before disassembly. This makes sure that bearing is seated. Make sure also that the big bearing race in the housing for the differential carrier bearing is also seated fully into the housing. The right side has an oil trap to lube the bearing. Make sure it is facing down in the housing should it come loose.
Insert the spring and plunger in the end of the driver. A little grease will keep them in place. Lube the o ring in the housing with grease or petroleum jelly. Align the shims for each housing and insert a bolt on opposite holes to hold them in alignment. Start the housing back into the tranny and push it far enough in to start the bolts. Use a thread sealant on the bolts as they go through the case and a seeping leak can occur around the bolts otherwise. LocTite 518 works well here. Start both sides' bolts before tightening any and then gradually tighten them, going to opposite bolts on the housing in a pattern until they all pull down. Don't strain the housing or the tranny case threads by running them down with the same two bolts, let all of them gradually pull the drivers into the tranny.